Vinyl Decal Removal
Vinyl decals are such a great and inexpensive way to advertise your business. Everywhere you look, you can see vinyl graphics advertisements! They're on vehicles, on windows, on floors...the possibilities are unending and people are finding new ways to use adhesive vinyl every day.
As long lasting as our vinyl is, everything needs an updated and refreshed look at some point. When the vinyl starts to crack or fade, you may find yourself wondering, "How can I get this off to replace it?"
Here are our tips and tricks for getting those graphics off your surface easily and quickly.
What Items You Will Need
Firstly, you will need to gather up some supplies. We recommend the following:
- A heat gun or hair dryer. Applying heat to your vinyl graphics will soften up the adhesive that is stuck to your surface. Please be aware, too much heat can damage vehicle paint. Use your best judgment and a lower heat setting.
- Adhesive remover. Sometimes, vinyl decals can leave a goop (adhesive residue). An adhesive remover will help remove any leftover gunk that the vinyl may have left behind. You can normally find a paint safe option at your local auto parts store.
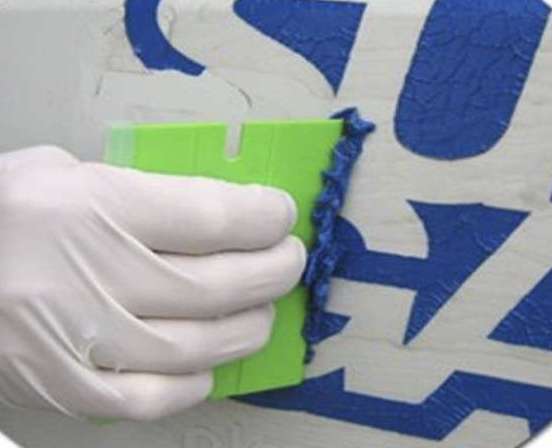
- A Graphics Removal Tool will help to easily scrape the letters/graphics from your surface!
- Rags/towels. To wipe off cleaner and adhesive, of course!
- Warm water and a mild detergent. To help get your surface squeaky clean and help remove any cleaner and/or adhesive.
- A clean surface. Dirt and dust will make it more difficult to remove your graphics. Wash your surface with warm water and a mild detergent, then let it dry completely before attempting to remove your vinyl decals.
Step by Step - Vinyl Graphic Removal
Alright! Let's get these graphics off!
- After you have cleaned and dried your surface, use your heat gun or hair dryer to soften up the adhesive on the vinyl by slowly moving the heater back and forth along the graphic. Do not stay on one area and remember to avoid plastic area, as they can and will be damaged by excessive heat.
- Using your Graphics Removal Tool, loosen the edges of graphics and gently lift the graphic at an angle to remove.
- If it starts becoming difficult to remove, you might need to reheat the surface. Remembering again to avoid plastic parts, such as handles or window trims as the heat can and will damage them.
- After removing each letter/graphic, you will use your adhesive remover to clean away any left behind adhesive residue.
- Clean your surface once more with warm water and a mild soap, making sure to dry when you're finished.
Every vinyl removal job is different. If your graphics are especially cracked or scraped, you will find that it does take a bit more time to do since the graphic doesn't come off in one piece. But, if you follow our guide, you will have the easiest time you possibly can with removal.
Now that we've got that bad boy off....
Maybe we need something new? Maybe you were looking to put a new logo on your company truck? We can definitely work that out with you! Maybe you just needed to upgrade from two lines to something with five lines? We got you covered there too!