How to design US DOT Stickers with Instant Preview
Here at DOTNumberStore.com, we are always trying to add new products that are easy to customize and 100% USDOT compliant. With so many size choices and material choices, you really can't go wrong with any of our products...but what if you wanted to preview your sign without the wait? What if you wanted to add a logo? Or want to alternate colors every other line? Or fonts?
NOW, YOU CAN!!
Recently, we have added a brand new product that will cut down on wait time and give you the fully customizable freedom you were looking for! With our Instant Preview Stickers, you can see live edits as you make them and you don't need to wait to see what your signs will look like. Our sign designer interface is simple to interact with and all the options for customization are easy to find. Let me give you a run down on this awesome product...
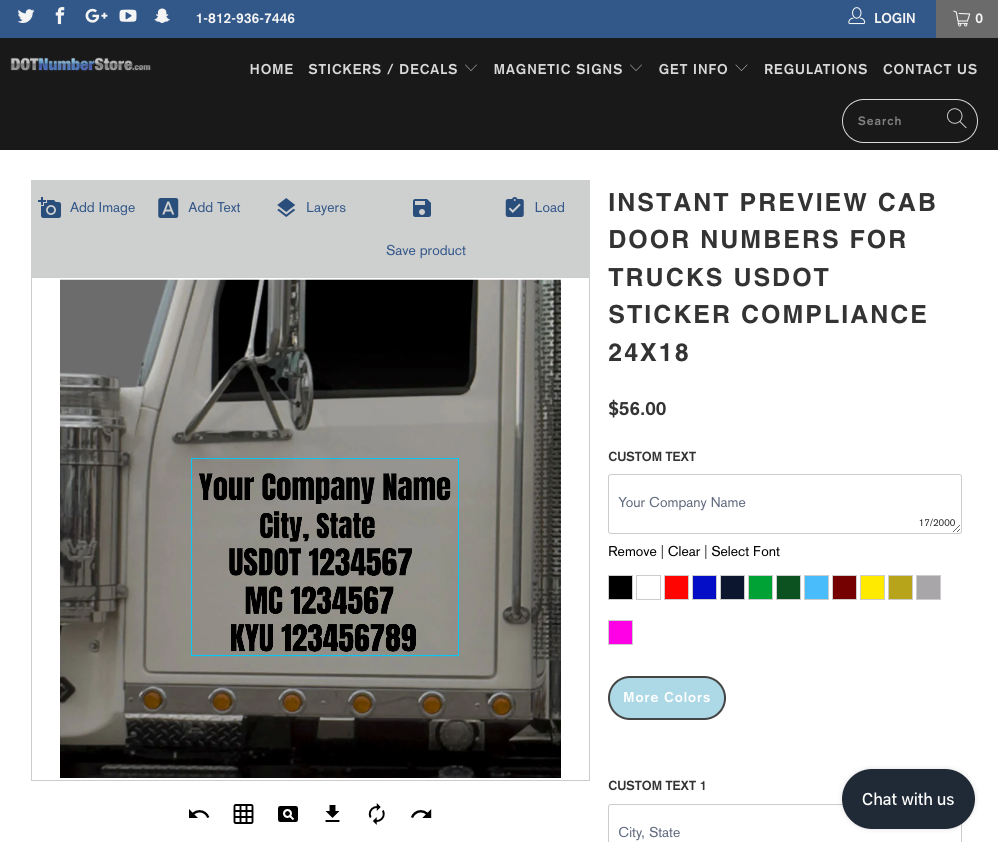
When you load up any of our Instant Preview signs, like this Instant Preview 24x12 sticker that I chose, this is what the customization screen looks like.

Up above the customization window, you will find the interface bar where you can upload your logo image, add text, view layers, and save your project.
I already have a high quality vector art image that I want to add as my business name. So, I will select the top line and delete it because I don't need my company name twice. To delete any line, you simply select the line and then click the trash can in the top left corner.

Then, I simply upload my logo by clicking the "add image" button shown here: 
A window will pop up asking you to upload your file. Select your logo file. The image should pop up on the customization screen.

Then, after some simple scaling of my image, I was able to move onto the text portion of my sign. Simply enter the text into the boxes OR click the line you want to work on...

From this window, you will be able to choose how the line is stylized with colors and fonts, transform the text with alignment, and size the text. You will do that same thing for Line 3.

Once I input my text in the text blocks, I chose my font and color. In just a few clicks, I went from simple text sign, like this one....

....to a much more eye-catching sign with my own recognizable logo that will both last for years and work for me by professionally advertising my services to everyone around me.

Now that I am done building my sign, we need to make sure that this project saves for the sign makers. So, we will go back up and hit the SAVE PRODUCT button.

When you click the SAVE, it will ask you to name the file and then it will ask you to either log in or give us an email that we can refer to when looking for this customization project. After you have entered that, a window will pop up saying "Product Saved!" Then you will be able to adjust your quantity and add the product to your cart!
When your customization is completed, it will look like this when displayed in your cart. Remember, if you need to cover both sides of your vehicle then you will need to order two signs.
I hope this walkthrough helps you to make the awesome, professional level signs you and your company deserve! If you have questions that I didn't answer or you just want to reach out for more info, please never hesitate to contact us!
Office: (812)-936-7446
info@dotnumberstore.com
Do you already have your USDOT numbers displayed on your vehicle, but now you want to place a company logo on there? We have a Logo Uploader tool, too! We've even made a guided blog post for our Logo Uploader that you can find here!